|
THE FINGER
SKIRT
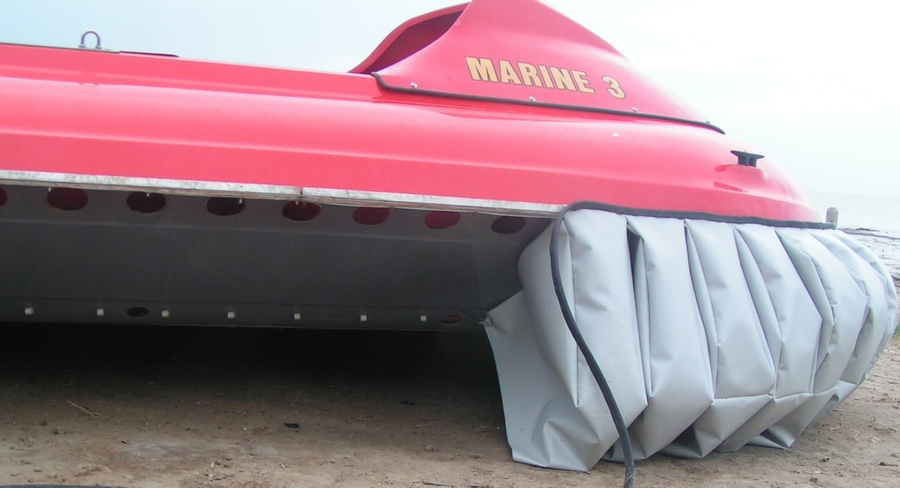
| The finger skirt is
comprised of a large number of
separate segments which are able to slide and bellow individually to
conform with the shape of the water surface or terrain over which the
craft is traversing.
The fingers should not be sewn or connected together in
any way or else the design of the skirt which is to form a very
flexible air seal between the hovercraft and terrain, will be defeated.
To achieve this, the fingers should only be attached to the craft by a
rigid strip along the upper edge and by some from of corner tie at the
two innermost apexes.
The straight finger serves well as a bow skirt due to the advantageous
receding angle of attached which helps in riding over waves and ground
undulations and at keeping frontal spray and dust to a minimum.
The straight finger however, is very unforgiving to being dragged
backwards over obstacles. The extended finger is best used at the
side and rear of the hovercraft as it has a better obstacle clearing
characteristic and also its design helps to maximise the effective
cushion area because the ground contact point is much further out
towards the hull perimeter than for that of the straight finger.
The inner fact of the finger skirt is completely open which means that
apart from a very marginal increase in pressure due to the peripheral
jetstream, is a very soft and flexible with only actual cushion
pressure holding it firm. This is vastly different to the
bag skirt which has a peripheral pressure much greater than cushion
pressure. The finger skirts at the rear of the hovercraft must be
equipped with either a single antiscoop flap or for improved
flexibility, individual strips may be sewn to the inner edges of each
finger which extend out belong the ground contact point. This
reduces their efficiency in retraining cushion air from escaping,
but unfortunately is quite essential if the hovercraft is to be used
anywhere than over smooth terrain.
To get a basic idea about the flexibility and difference of the finger
skirt in relation to a bag and finger skirt as described at : "Bag
and Finger skirt" take a look at the following clip out of 007 and
pay close attention to the smaller crafts with finger skirt in relation
to the bigger craft with a bag and finger skirt ...lol and not so much
to the action ..lol
|
CHARACTERISTICS
OF THE FINGER SKIRT
The straight finger skirt is easy to design and construct and repair
work is also easy because of the small size of each segment. The
extended finger however is a little more difficult to design .
The finger skirt, straight or extended, gives a very smooth ride and
has a low friction characteristic and so long as the cushion height is
adequate, is ideal for travelling at high speed over waves and
rough ground. Apart from the rear fingers which should have an
anti-scoop flap, a hovercraft with a finger skirt does not trap water
like a bag skirt at lift off. An extended finger uses a great
deal more material than a straight finger or bag skirt and for this
reason, it has become common practise for the expensive low friction
neoprene coated fabric to be used only on the knuckle which constantly
rubs across the on-coming waves and for less expensive non-coated
fabric to be used on the bellow and sides of the finger.
To construct a Straight Finger Skirt.
Straight Fingers are best used at the bow of a hovercraft.
To design a straight finger you must draw the cross-section of the
skirt under the bow and make a paper template to this shape. Draw
a rectangle of width equal to half the hoverheight and of height equal
to the skirt length from the nose of the hull to the ground contact
point. Duplicate the cross section pattern and lay these
alongside the rectangle.
Allow for a seam at the top of the rectangle and then using this
completed shape, make a
full template out of plywood.
To make the skirt, simple mark around the template and cut out as many
fingers as are
necessary to evenly fit across the bow of your hovercraft.
|
TO CONSTRUCT
AN EXTENDED FINGER SKIRT.
Extended fingers are best used at the side and rear of the craft
although it is common practise to use them as bow fingers also, in lieu
of the straight finger which has a set back ground contact point.
To draw a development, you must draw the cross
section of the skirt under the bow and make a paper template to this
shape. Next draw a rectangle of height equal to the straight fore
edge of the cross section and of width equal to half the
hoverheight. Transpose the cross-section shape along both sides
of this rectangle and then draw in two smooth curves from the
centre of the top of the rectangle out to the outer hull contact points
of the two adjoining skirt cross-sections.
The extended skirt knuckle is developed by extending two
curved lines upward from the centre of the top of the rectangle to
intersect with a horizontal line equal in width to half the hoverheight
and at such a height that the distance along the outward radiating
curves is exactly equal to the upward radiating curves. The
lengths of these curves must be equal as they represent the common
stitch lines on the finished finger and the hull contact point on the
cross-section shape and the top of the knuckle must come together at
the same point. Allow for a seam at the top of the knuckle and
then using this completed shape, make a full template out of
plywood. The knuckle template will naturally be separate from the
lower part, but when making the skirt, it may be an advantage to leave
a web of material between the two curve lines on each side to
facilitate stitching.
If you use straight fingers on the bow, you will need to
make approximately three fingers on each side with progressively more
knuckle bellow to accommodate the transition between the straight
fingers and the extended fingers.

4wings Main page
- 4wings Yachtservice - Kite-sailer.com - Site-map
|
|
Related
external links
Coated fabrics
Vinyl
Tarp 18 OZ Vinyl Coated Polyester
|

