|
THE BAG
SKIRT
Description.
The inflated loop consists essentially of a tube of material (similar
in a way to a car inner
tube) which is inflated at a slightly higher pressure than the air
cushion beneath the craft
and this is achieved in one or two ways:
- The full flow system feeds all the lift air into the
skirt and from there through small holes in the inner skirt wall into
the cushion. By controlling the number and size of the holes it
is possible to alter the pressure differential between the loop and the
air cushion.
- The no-flow system pressurizes the loop via small
scoops at the tip of the lift fan. The size of the scoop is about 10%
of the total lift fan area. The skirt is sealed and does not have
any exit holes since most of the air is fed directly into the
cushion. Even small tears in this type of skirt can, however,
lead to considerable loss of skirt pressure which in turn could result
in dangerous instability.
|
Skirt Characteristics.
The bag skirt is fairly simple to design and construct but gives a
harder ride than the segmented type and has more limited obstacle
clearance, depending upon the pressure differential between the loop
and the air cushion.
Usually it gives fairly high drag over undulating surfaces.
The inflated loop skirt is very stiff in roll and pitch and as such a
good choice if you use your craft mostly over water.
|
THE BAG SKIRT
CROSS SECTION.
To design the cross section, the height must first be established and
this should be about
one eighth of the craft width. The cross section of the bag is
comprised of two radii, the outer curve and the inner curve. For
simplicity it can be assumed that the ground contact point is directly
beneath the outer extremity of the hull and therefore the outer radius
is equal to half the distance between the ground and the upper fixing
point.
The ground contact point can in fact be positioned fractionally in from
the outer hull edge
but for the sake of stability, it must never be
outside. To design the cross section, make a scale drawing of
the craft lower hull at the appropriate hover height and draw in the
outer semi-circle.
The radius of the inner circle is calculated by multiplying the outer
radius by a factor
given in the following table.
Pressure Differential
bag pressure / cushion pressure
|
Factor
Inner radius / outer radius
|
|
1.2 : 1
|
6.0
|
|
1.3 : 1
|
4.53
|
|
1.4 : 1
|
3.5
|
|
1.5 : 1
|
3.0
|
|
1.6 : 1
|
2.66
|
|
1.7 : 1
|
2.43
|
|
1.8 : 1
|
2.25
|
The choice of pressure differential is based upon the degree of
stability required. The higher the ratio the greater the
stability, but at the expense of undulating surface performance and
higher skirt wear on uneven terrain. As such please dont shoot for a to
stiff skirt.
After calculating the inner radius, draw in the inner circle.
This will give the inner skirt
fixing point and note that the changeover from the small radius to the
larger radius is at a
point 15 degrees in from the ground point. The skirt cross section
calculated in this way has balanced geometry and will automatically
take up this shape, provided that the pressure differential is
accurately predicted.
THE BAG SKIRT -
BOW SECTION
An ordinary side cross section at the bow would be very prone to
plough-in problems, therefore the bow section is usually designed with
a less bellowed outer curve. This shape however, does not have
balanced geometry and so it will not automatically take up this shape
but must be forced to do so by the tailoring. The inner curve has
the same radius as that of the side cross-section, but the outer radius
is now centered on a point retracted well in from the leading edge of
the hull. This is quite acceptable if the bow corners are tapered
back, thereby providing a number of joints where the skirt can be
forced into this shape.
If the bow is straight with square corners, the long front panels of
the skirt will not adopt this shape and will tend to round out.
To overcome this problem, the bow skirt will need to be designed with
balanced geometry which means using a much larger inner radius.
To layout this cross section, center the outer radius at a distance
equal to r x 0.85 in from the leading edge and maintaining
a hover height of 1/8 hull width, use an inside radius equal to r x
FACTOR as used in calculating the side cross section - see table
below.
Pressure Differential
bag pressure / cushion pressure
|
Factor
Inner Radius / Outer radius
|
|
1.2 : 1
|
6.0
|
|
1.3 : 1
|
4.53
|
|
1.4 : 1
|
3.5
|
|
1.5 : 1
|
3.0
|
|
1.6 : 1
|
2.66
|
|
1.7 : 1
|
2.43
|
|
1.8 : 1
|
2.25
|
The disadvantage of this skirt is the large overall width of material.
As well as very high wear on uneven terrain around the ground contact
line. Even if you can patch several times your bag skirt you will need
to replace him once the patches produce major wrinkles in the lower
section ( 3" inner and outer of ground contact line ). |
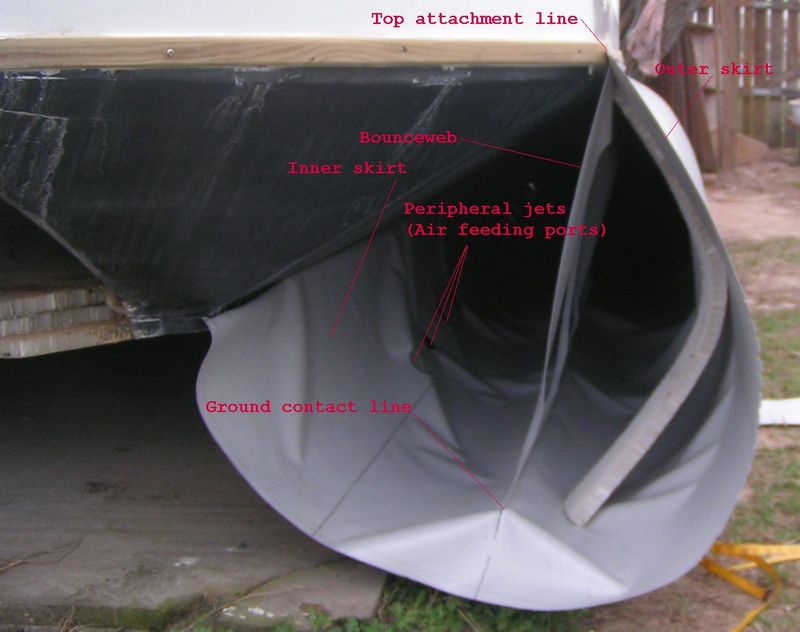
THE BAG
SKIRT - PERIPHERAL JETS
The bag skirt requires a number of holes on the inner fact to transfer
air from the skirt to the cushion. These holes vary in size but
are generally 3 - 6 inches in diameter.
The total required area of these holes can be calculated using the
following formula:
Where A = Total area of peripheral jets (sq. ft)
Q = Air
Flow
(cu ft / sec)
Pb = Pressure in the
bag (lb. /
sq. ft)
Pc = Pressure in the
cushion (lb. / sq. ft)
Cut about 90% of the calculated number of holes and then
slowly cut out the remainder, checking regularly the relative pressures
with a simple water manometer until the required differential is
obtained. Holes should only be cut in the bow and side sections
of the skirt. No holes should be cut in the rear section as this can
cause water scooping.
|
SKIRT
TAILORING
Once the skirt cross-sections have been worked out you have to decide
how to cut out all
the panels of material and assemble them so that the skirt will adopt
the required shape.
Tailoring of skirts is quite an art and can be approached in two ways;
one is by employing
a mathematical method and the other is by using a system of templates.
THE BAG SKIRT
The Mathematical Method:
To begin, scribe marks around the skirt circumference at intervals of
100 mm, starting from the inside edge. These marks will be the
contour lines. Measure the horizontal distance from the outer
skirt fixing to each of these contours.
These contours now have to be plotted on a scale horizontal plan of the
craft. Each contour line should be drawn its respective distance from
the outer fixing. The method to calculate a rear corner by drawing
lines along every side. To design a piece of material from AA' to BB',
draw a 'line (xy) midway between AA' and BB' at right angles to the
body. On a piece of skirt material, put a line XY and draw
contour lines at right angles to it and at 100 mm intervals. Measure
the distance between the AA' line and the xy line along each of the
contours and transfer the distances.
For example, the distance between xy and AA' along the 900 contour is
300 mm, therefore put a mark 300 mm from XY on the 900 contour and
repeat this for the xy to BB' distances. When this has been done
for each contour line, link the marks and you will have the shape for
the panel. When cutting out the panel, allow a 20 mm margin to
allow for sewing and gluing. To make up the skirt, pin the two
adjacent panels together along the sewing line and sew several times
for strength.
Calculating the bow.
The same techniques can be applied for the bow as that used for the
other skirt sections. This is done by taking 100 mm contour points
around the bow section and plotting these on a scale horizontal plan of
the craft together with the side contours.
The Template method.
Cut out a number of full-size templates of the required size from stiff
cardboard or plywood. Turn the craft hull up - side down and
affix the templates in position. Place the skirt material over
the templates so that it adopts the proposed shape of the skirt.
Where pieces of the skirt meet at the joint, they may be joined
together with pins and subsequently sewn together as described in the
mathematical method.
Or try to make a mock up from your finally skirt shape in foam - mark
all different angles ( attachment panel to panel ) and copy
to cardboard. Lay cardboard on skirt material and transfer shape -
allow again at least 20 mm for sewing and gluing panels together. Check
shape on your foam mock up and continue.
4wings Main page
- 4wings Yachtservice - Kite-sailer.com - Site-map
|
|
Related
external links
Coated fabrics
Vinyl
Tarp 18 OZ Vinyl Coated Polyester
|